With such an extensive range of high performance lighting solutions in our repertoire it is no surprise that the variety of vehicles they are fitted to is equally as wide. We are frequently asked about out reccomended lamp set ups for Snowmobiles, ATVs, Quads and even Motorbikes, and also how to carry out the correct installation process - it is the purpose of this blog to address both these common enquiries!
Our Recommended Lamp For Snowmobiles / ATV'S / Quads / Motorbikes
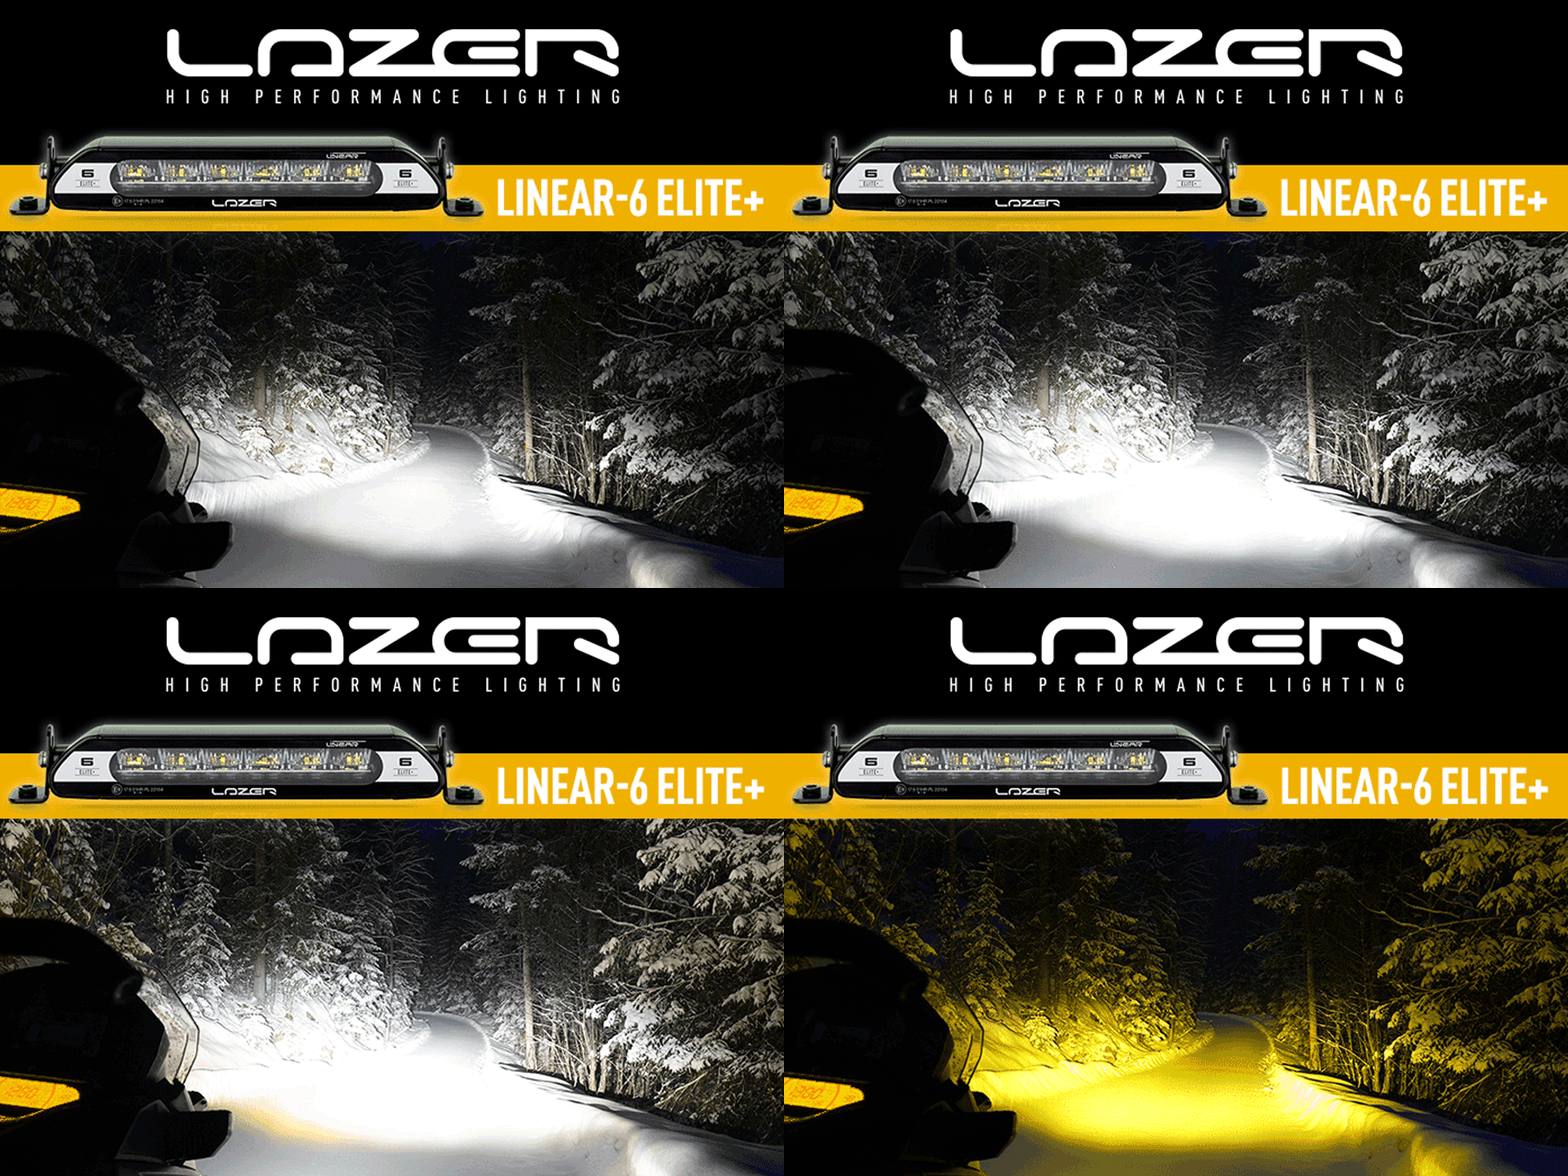
The Linear-6 Elite+ stands out as the best lighting solution for snowmobiles and other ATV installations. Why? Because not only is it compact and versatile, but it also has incredible adaptive lighting functionality. With 4 distinct lighting modes available at the touch of a button, it is truly optimised for lighting the way through the harshest weather conditions.
A common difficulty for snowmobile riders who are wanting to fit LED auxiliary lighting is the the risk of high voltage DC output from the voltage regulator rectifier. When these fail, which can happen when exposed to extreme sub zero temperatures, it is possible to introduce high voltage from the stator to the accessory circuits of the snowmobile. This overvoltage can then cause accessories such as LED lights to fail.
An important advanatage of using the Linear-6 Elite+ is its 33v max voltage limit and in-built over voltage protection. The lamp automatically shuts off at 33v as a warning to the rider, the protection drains off excess voltage to try and protect the circuitry when over 33v. This protection makes it a preferable solution over other products which have a lower max voltage and at 33v could fail permanently. *It is important to be aware if this happens the rider needs to turn off the high beam switch, as the inbuilt protection is not a guaranteed failsafe, prolonged exposure to over 33v or even higher voltages over 40 are likely to damage the lamp permanently.
Although we would direct customers to the Linear-6 Elite+, we do also have customers who have successfully fitted ST Evolution, Triple-R and Utility Series lights to these vehicles and have benefitted from the huge increase in illumination, which of course is a big benefit away from urban areas, off road, or off-piste.

Installation Guide
Once you have chosen your light, the next important step is considering installation - the electrical systems are slightly different with these vehicles compared to a car, pickup or 4x4. They often incorporate an AC electrical circuit rather than DC and rely on a rectifier and regulator to create a DC current.
Alternator or Stator?
A car or truck is fitted with an external alternator to generate electricity but motorcycles and ATVs utilise a permanent magnet AC generator known as a Stator which is incorporated within the engine block itself (see image) with wire/s that connect to an external rectifier and regulator. These generators could have single-phase or a three-phase winding, but we are only concerned about the current.
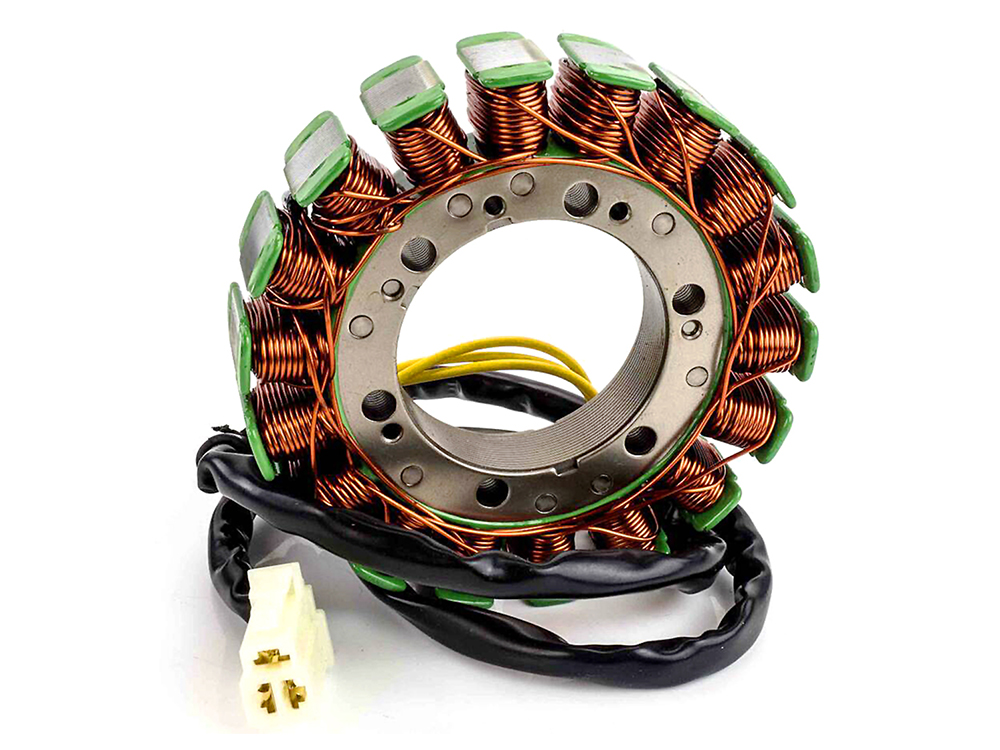
As the engine speed and RPM increases, so does the voltage output so the output voltage of the regulator is vitally important to constrain the voltage within a prescribed range and avoid overcharging of the battery and overpowering other components. The good news is that all Lazer Lamps LED lights are all designed to operate within a voltage range of 10v-32v, so there is an amount of flexibility, but it must be a DC current.
The Different systems which utilise a Stator
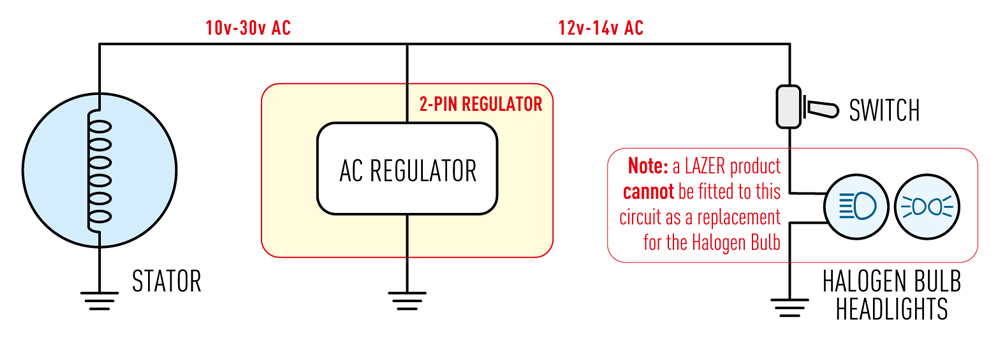
2-pin Regulator
This is the most basic type of installation shown here simply as a reference only. It is commonly only used on bicycles to power lights, there is no battery, the current to illuminate the bulb is provided only when the cycle is moving, but as the bulbs used can work well on AC voltage, there is no rectifier and the circuit inside the generator regulates the AC voltage to 13v- 14v for the bulbs.
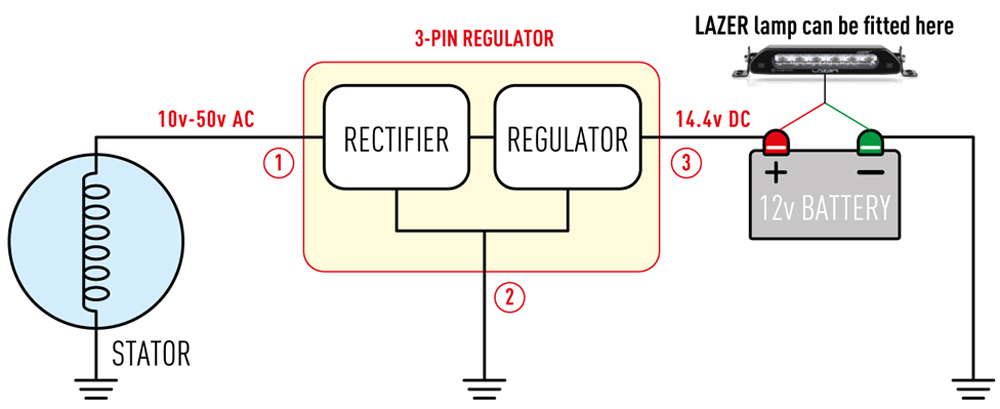
3-pin Regulator
To be found on some motorcycles, in this circuit the stator is grounded to the chassis of the bike, which is also connected to the negative terminal of the battery. The Stator also supplies AC current to the rectifier, which convert it to DC voltage, then on to the regulator which maintains the output to around 14.4V – ideal for charging a 12V battery – and powers the electrical system.
4-pin Regulator (type 1)
This circuit may also be found on some motorcycles. Both outputs from the Stator connect to the Rectifier which converts the AC current to DC voltage and the Regulator maintains 14.4V to charge the battery, as mentioned above. 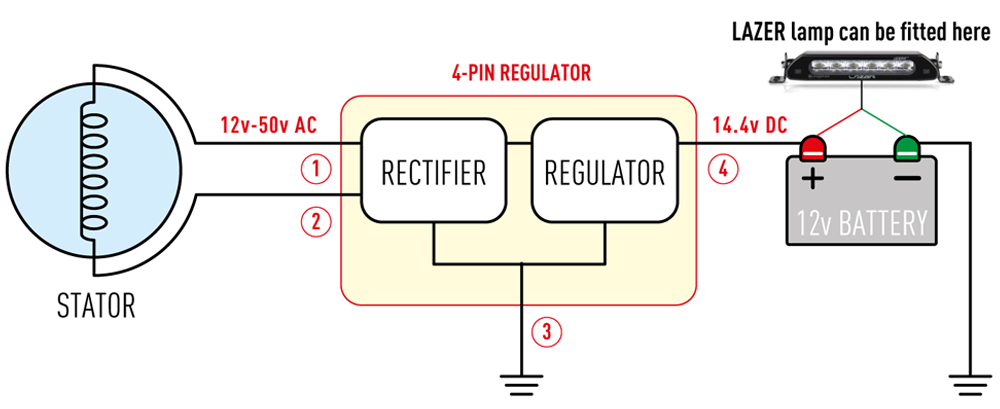
4-pin Regulator (type 2)
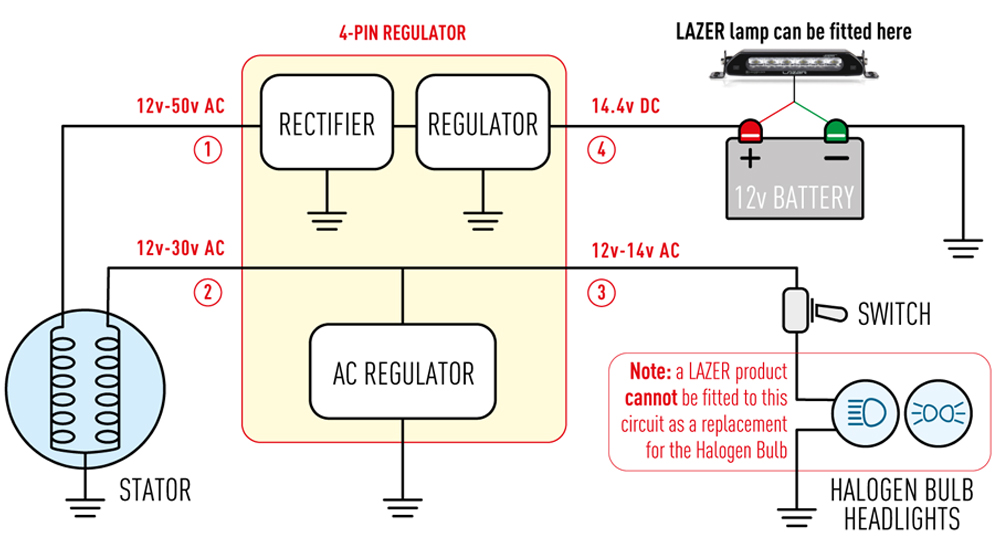
This is the most common circuit to be found on motorcycles and ATVs with a single-phase generator. Here the stator has dual output: One charges the battery and powers the electrical system. The other just powers the lights. However the current to the lights is still an AC current as it bypasses the rectifier.
Installing Lazer Lamps
To install Lazer Lamps LED auxiliary lights to any of these systems you will first need to identify the current and voltage. As mentioned, our lights will operate within a range of 10v-32v but it must be DC.
If your snowmobile / motorcycle / ATV uses an electrical circuit similar to the 4-pin Regulator (type 2) diagram (above) it will not be possible to simply connect the auxiliary LED lights to the existing lights as these are AC. In this instance an electrical feed must be taken between the rectifier/regulator and the battery, or direct from the battery itself and switched separately.
Depending on the exact model of your vehicle and the installation of the electrical circuit it may be necessary to install an additional rectifier/regulator to sit between the stator and the auxiliary lights.
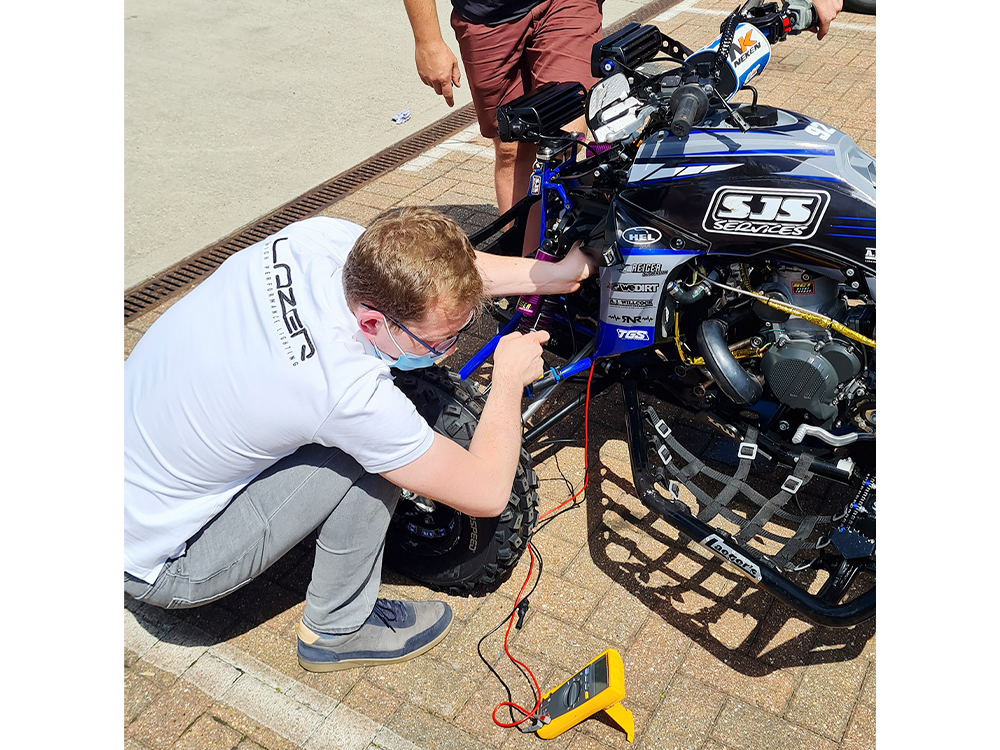
Using a multimeter you will need to take readings from the electrical wiring harness to locate a regulated DC current. It is worth taking the readings in different states: With the vehicle ignition on but engine not running; Engine running at idle; Engine revving at high RPM.
Once you have located a suitable feed you just have to decide on a suitable mounting point for the lamp and brackets. Our lights offer great flexibility in terms of brackets, end mounts, top mounts and bottom mounts are all possible depending on the lights chosen. And you don’t necessarily have to mount the lamp horizontally, some motorcycles and ATVs are suitable for mounting an LED auxiliary light vertically.
If you are unsure of the suitability of lights for your particular use please get in touch with us for advice or contact one of our authorised dealers.
To learn more about our products, explore partnerships or for any further information please get in touch with us via the details below:
+44 (0)1992 677374
sales@lazerlamps.com
To follow our Lazer's journey through social media channels:
Instagram - https://www.instagram.com/lazerlamps/
Facebook - https://www.facebook.com/Lazerlamps/
TikTok - https://www.tiktok.com/@lazerlamps
YouTube - https://www.youtube.com/user/Lazerlamps
 Hergestellt in Großbritannien


